


So many of us find ourselves sitting all day at a computer. It’s very likely the reason why yoga teachers constantly hear students complain of tight hips and back pain. When we remain seated for hours at a time, our hips and knees are in constant flexion, and if we hunch forward over a screen, we’re in prolonged protraction of the shoulder blades and flexion of the spine, which over time can cause aches and poor posture. Prolonged sitting also puts significant stress on our low back as well as our hips.
Yoga Sutra 2.46, Sthira Sukha Asanam, refers to finding steadiness and ease in your seat. Though this sutra is intended to apply to your posture during meditation, I believe it’s also applicable to the way we experience every aspect of our lives. If we can create a sense of ease and steadiness in our most frequent posture, imagine what this could do to establish a more constant sense of equilibrium in our bodies and minds.
Although this yoga sequence for sitting all day is designed to remedy the physical repercussions of working at a desk, on a deeper level, it can also bring steadiness and ease to the way we approach all our daily postures. Yoga transcends far beyond the movements we make during our practice. I remind myself of this daily.
11 Yoga Poses to Stretch Out After Sitting All Day
If you sit at a desk for most of the day, these poses are for you. As you move through each of these shapes, bring your awareness to how the targeted body part responds when asked to move outside of your typical comfort zone. In moments of discomfort, first maintain a steady and easeful breath and then, if necessary, lessen the intensity or come out of the pose.
Before you come into the first posture, find an easy seat and give yourself time to consciously unplug from the events of your workday. Close your eyes and take a few slow and deep breath cycles to disconnect and reset your mind.

1. Hands and Knees With Wrist Stretch
Why it helps: Many of us are tethered to technology, which can be taxing on our forearms and wrists. This variation of Tabletop helps undo a day of typing.
How to: Come to hands and knees and flip your hands so that your palms face up and your fingertips point back toward your knees. Make sure that your wrists are still aligned beneath your shoulders and your hips are over your knees. If the pressure feels too intense on your wrists, shift your weight back a little more into your knees so that the angle at your wrists is less sharp. If it feels good to do so, slowly rock forward and back a few times or take a few Cat and Cow motions. Remain here for 5–10 breaths. With care, lean back slightly and bring your palms to the mat.
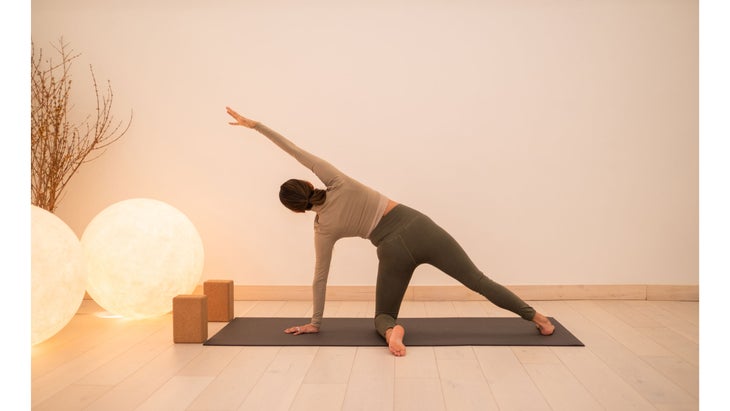
2. Vasisthasana Variation (Modified Side Plank Pose or Gate Pose)
Why it helps: This pose is a wonderful way to stretch your side body, which often gets compressed when we sit. The sides of our torsos are home to our intercostal muscles, which help us breathe. Take time at the beginning of your practice to create space to breathe more fully on your mat.
How to: From Tabletop, extend your right foot toward the back of your mat and turn your heel down so that your entire foot connects to the mat and the edge of your foot is parallel to the back of the mat. Pivot on your left knee to bring your left foot directly behind your left knee and your shin parallel with the back of the mat. Stretch your right arm overhead. Breathe into your right side to your capacity. Remain in this shape for 5–10 breaths. Come back to Tabletop and switch sides.
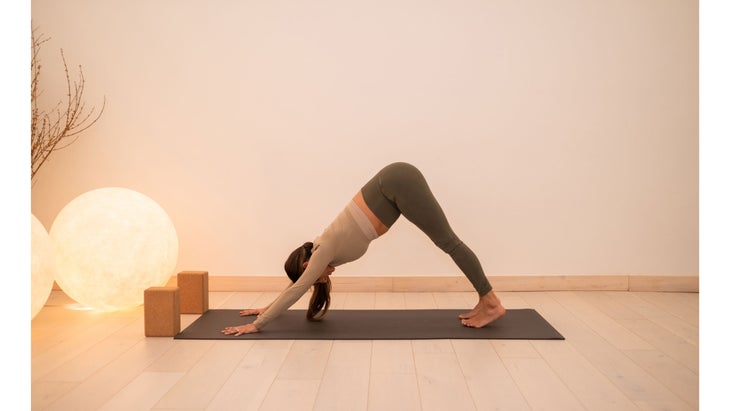
3. Adho Mukha Svanasana (Downward-Facing Dog Pose)
Why it helps: This foundational pose helps lengthen the hamstrings and calves and develops upper body strength. The inverted nature of this yoga asana also improves circulation, which is imperative after you’ve been sitting all day.
How to: From Tabletop, lift your hips up and back to Downward-Facing Dog. Begin with a slight bend in your knees so that you can focus on lengthening your back rather than the backs of your legs. Spread your fingers wide, and evenly distribute your weight between your hands. Turn your inner arms upward and relax your shoulders. Draw your ribs in toward your back and lift your sitting bones toward the sky. Counter the arch in your low back by heavying your tailbone toward your pubic bone. With the knees slightly bent, press your thighbones back toward the wall behind you. Spread your toes wide and evenly distribute your weight between your hands and feet. Soften your gaze and drop your head so that your upper arms line up with your ears. Breathe steadily into the entire length of your back body for 5–10 breaths.
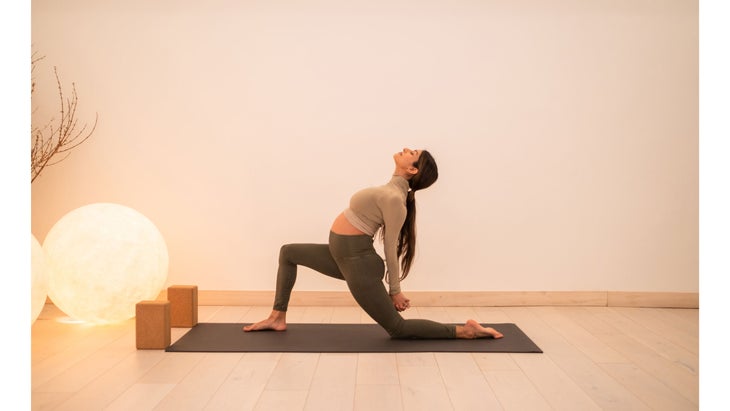
4. Anjaneyasana (Low Lunge With Locust Arms)
Why it helps: In a lunge, your back leg is in hip extension, which is a great way to counter the prolonged flexion of the hips that occurs when we sit for extended periods. The arm variation opens up your chest and upper back as well.
How to: From Downward-Facing Dog, step your right foot forward between your hands. Take care to slide your foot forward enough so your ankle lines up beneath your knee. Lower your left knee down and untuck your toes. Slowly breathe in and sweep your arms overhead, and as you breathe out let your arms drape alongside your body. Interlace your fingers behind your back with your right thumb on top. If it’s difficult to touch your hands, use a strap, scarf, or towel to bridge the gap. Press down through both feet for stability. Take a breath in and lift your chest as you slide your knuckles down your back leg. As you exhale, remain here and notice the sensations of opening your left hip and your upper chest. Keep the inner and outer corners of your eyes soft to create ease in moments of challenge.
To come out, release your hands and, as you inhale, sweep your arms overhead. As you exhale, release your hands to the mat to frame your front foot and step back to Downward-Facing Dog. Repeat on your left side.
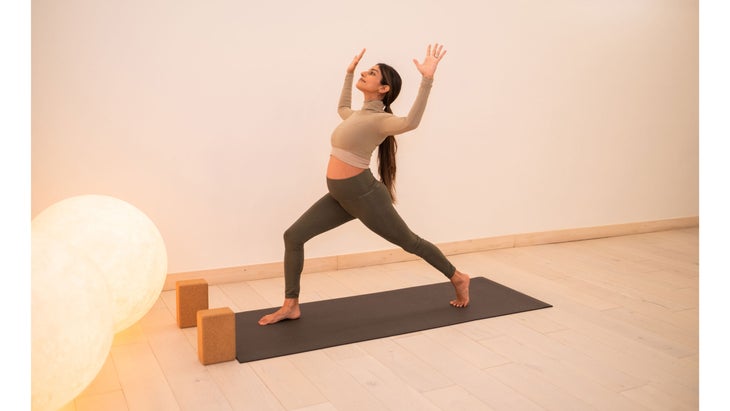
5. High Lunge with Cactus Arms
Why it helps: This strengthening version of a lunge also stretches the hip flexors. The arm variation opens the shoulders and provides a different backbend to release your chest after a day of hunching forward.
How to: Similar to the last pose, from Downward-Facing Dog Pose, step your right foot forward between your hands. Take care that your forward ankle lines up beneath your knee and keep your back knee raised. Inhale and sweep your arms overhead. Exhale and bend your elbows 90 degrees. Take a moment to soften your back knee slightly so that you can move your pubic bone forward and recruit the low belly muscles. Straighten the back leg any amount while keeping the engagement of the lower belly and the length you created in your lower back. Lift your chest and lean back to let your heart fall into the support of your back body. Breathe easily into the shape for 5–10 breaths.
To come out, breathe in and stretch your arms up. As you breathe out, release your hands to the mat to frame your front foot and step back to Downward-Facing Dog. Repeat on the other side or first come to Virabhadrasana II (Warrior Pose II), which follows.
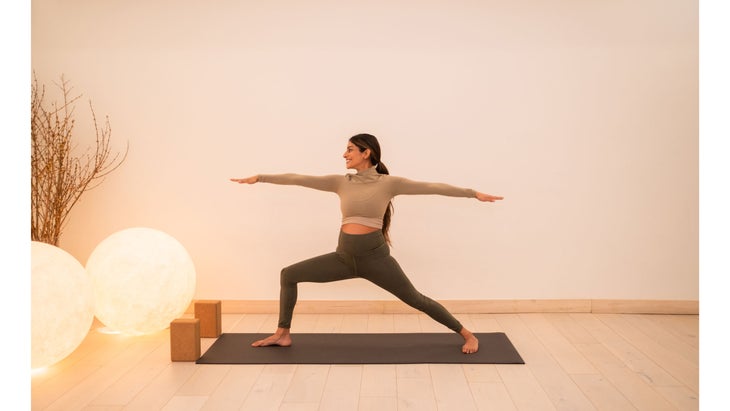
6. Virabhadrasana II (Warrior II Pose)
Why it helps: Warrior II is an important foundational pose that gives your body a chance to open the inseam of your legs as well as strengthen your quadriceps, back, and arms. In addition, the external rotation of the front leg helps you increase mobility and flexibility in your hip joints.
How to: Come to standing, facing the long side of your mat with your feet parallel to the short edges of your mat. Stretch your arms straight out and face your palms toward the ground. Turn your right toes to point forward and bend your right knee. Line your right knee up over your ankle. Angle your left toes in at 15 degrees and press into the outside edge of that foot. Notice the stability this small adjustment creates for the foundation of your pose. Slide your tailbone down and lift up through the sides of your torso. Stack your shoulders over your hips and stretch your arms in opposite directions with a sense of purpose. Take your gaze softly forward to rest over your right forefinger. Take a breath in to broaden across the chest, breathe out to remain here.
To add a shoulder opener, turn your thumbs to face down as you bring your hands behind your back. Grab for opposite elbows (note which arm is on top) or connect your palms for prayer hands behind your back. Notice if your shoulders have slumped forward as if you are sitting at your desk. If so, give your shoulders a little more space by separating your prayer hands slightly or take your elbows out wider. Feel the shoulder blades knit together on the back body and counter the sensation of curling forward. Ease your focus back to your breath for 5–10 cycles.
Breathe in, straighten your front leg and reach your arms overhead. Breathe out and repeat this shape on the left side, switching which arm is on top if you grab opposite elbows. After both sides, come back to Downward-Facing Dog.
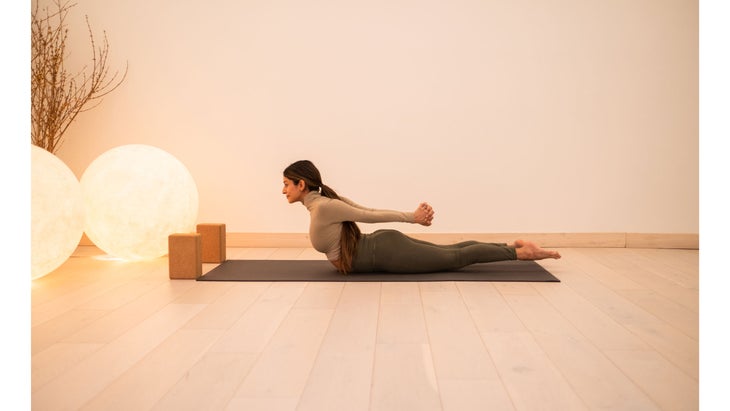
7. Salabhasana (Locust Pose)
Why it helps: This pose is so important for creating strength and stability along the entire backside of our bodies. It opposes the shape of sitting in a chair and thus helps us strengthen the muscles that are periodically neglected all day. To put sthria sukha into practice, we must create and restore a sense of equilibrium for our bodies through the movements we choose to make, which makes backbends a must.
How to: From Downward-Facing Dog, roll forward to Plank Pose and lower down to lay on your belly. Rest your hands underneath your shoulders. Breathe in and raise your head, chest, hands, and feet. Breathe out and stretch your arms back and interlace fingers above your bum. If your hands do not connect easily, use a strap, scarf, or towel to bridge the gap, or keep your arms alongside your body. Point your toes and lift your thighs as you keep your pubic bone on your mat. Move your heart up and forward to feel a sense of spaciousness in your back body. Keep your soft gaze about a foot in front of the mat so that your neck is a natural extension of your spine. Breathe with ease here for 5–10 cycles. Release your hands on an exhale and lower your forehead and toes to your mat.
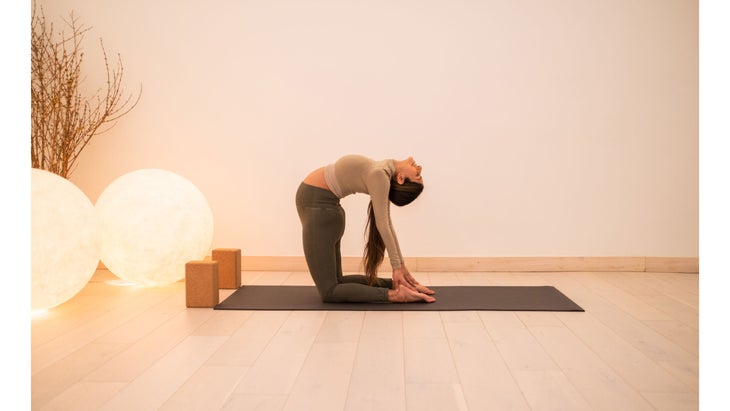
8. Ustrasana (Camel)
Why it helps: This pose not only physically counters the typical shape of sitting in a desk chair all day, but also gives us a chance to practice finding ease in the more stressful moments of our days. The more we practice breathing a sense of ease and steadiness into the challenging moments on our mat, the more this tool comes with us off our mat and into our lives. Camel Pose is a challenging one for many of us. Backbends trigger the sympathetic nervous system, which is commonly described as the “fight or flight” defense system. This is why many people feel anxious in poses such as Camel. However, keeping a steady breath and gaze actually trigger the opposite and trigger our parasympathetic nervous system (think “rest and digest”).
How to: Come to stand on your knees and glance back at your feet to make sure they are in line with your hips. Check your knees to make sure they are under your hips. Place your hands on your low back with the fingertips pointing down. Use your hands to slide the skin of the low back downwards as if you are creating more space for your body to open from.
Choose one steady thing in front of you at eye level to look at when you come up out of the pose. Breathe in and lift up your chest, breathe out to pause and take in your stable connection to the ground. You can keep your hands on your low back. Or reach back for the heels while being conscious of your hips staying in line with your knees. Lift through the sides of your torso to create a sense of elevation in your heart. Check in with your gaze and breath, bring a sense of sthira sukha to both. Breathe here for 5–10 cycles.
To transition out, return your hands to your lower back and breathe in as you rise up. Sit your bum to your heels, rest your palms on your thighs, and gaze softly at the one steady point you selected in front of you. Breathe in ease, breathe out steadiness. Come to Downward-Facing Dog and focus on lengthening your back body here for 5 breaths.
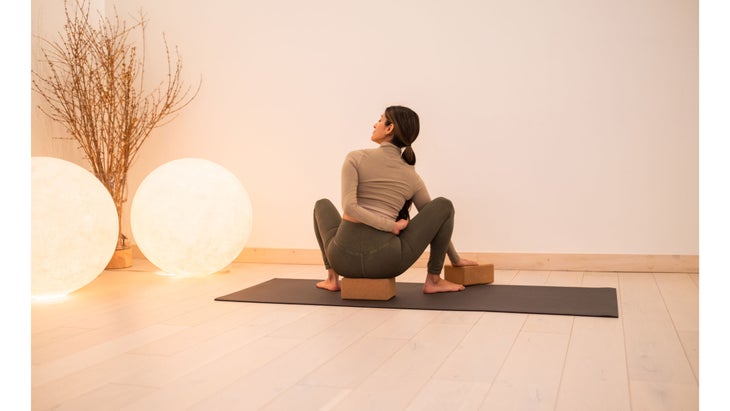
9. Malasana Variation (Supported Squat)
Why it helps: This pose counters the shape of being seated at a desk through external rotation of your hips. The bound arms in this variation initiates spinal rotation and shoulder retraction, which counter the typical posture of hunching over a screen.
How to: From Downward-Facing Dog, maintain a softness in your knees as you walk your feet up to your hands. Separate your feet mat width distance apart and point your toes outwards. Take a breath in and lengthen your spine forward, with your exhale lower your seat into a squat position. You can place a block or two stacked blocks underneath your sitting bones for support. If it is hard to keep your heels on the ground, try angling the feet out further.
Place a block in front of your right foot and take your right hand to the block. Breathe in and raise your left arm up and out to the left. Breathe out and slide your left forearm behind your back any amount. If you find that this variation causes your left shoulder to slump forward, take your hands into prayer instead and use your elbows against your inner thigh to create a sense of spaciousness in your back. If you take the twist variation, breathe deeply into ease for 5–10 cycles before switching sides.
You can take a brief standing forward fold between sides if your hips need a break. After you’ve completed both sides, bump your hips up and slide your feet in line with the hips for a passive forward fold with soft knees. Let the base of your skull drop as you let your breath ease you into the present moment.
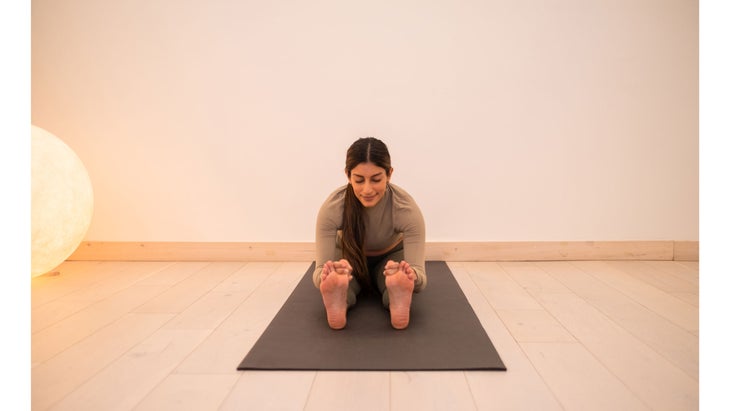
10. Paschimottanasna (Seated Forward Bend)
Why it helps: An active forward bend creates length along the backs of your leg muscles, which are usually constricted when you sit in a chair with your knees in flexion. Additionally, the following variation asks you to keep your back body muscles engaged as you lengthen your spine to counter the laxity of slumping forward.
How to: Come to sit on your mat with your legs stretched out in front of you. If it is difficult to straighten your legs, you can keep your knees slightly bent or try a block or folded blanket underneath your seat. Take a breath in and stretch your arms overhead, let your breath out as you fold forward and reach for your feet. Focus on keeping a sense of length in your back body, even if that means your fold is not extremely deep, rather than rounding your back. You can rest your hands on your shins if it is difficult to reach your feet. Press your sitting bones back and your thigh bones downwards toward your hamstrings. Ease the muscles of your face and let your shoulders rest on your back body as you breathe for 5–10 cycles. Inhale and slowly rise.
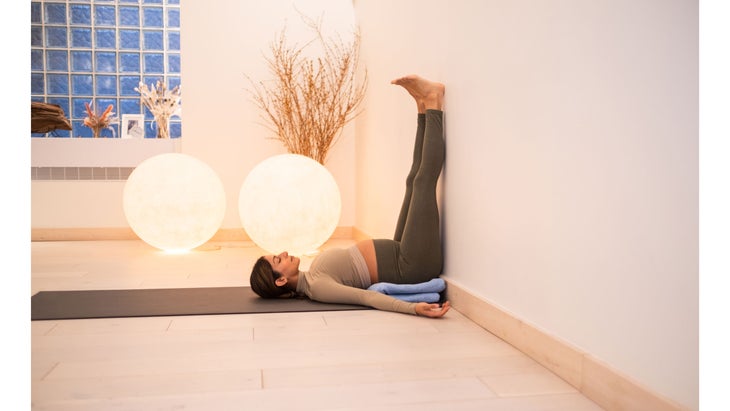
11. Viparita Karani (Legs-Up-The-Wall)
Why it helps: This is a great pose to end a long day for many reasons. It’s calming and relaxing to the body and mind, yet it also stimulates your circulation after a long day of sitting still.
How to: Place a folded blanket or a shallow bolster about 4 inches away from a wall. Sit on top of the blanket or bolster with one of your hips against the wall. Slowly swing your legs up the wall as you lower your shoulders down to the floor. Slide your bum as close to the wall as is comfortable so that your sit bones are off the blanket. The bolster or blanket should be positioned between the bottom tip of your shoulder blades and your sacrum. If this is too much strain on your hamstrings, bend your knees slightly and scoot yourself slightly further from the wall. Your chest should feel broad and expansive and give way to easy breathing. Take in the feeling of the steady ground underneath you. Breathe a sense of ease into your shoulders, your back, and your legs. Rest here for 3 to 5 minutes.
See also: 7 Yoga Poses to Melt Away Neck and Shoulder Pain
About our contributor
Neeti Narula is a yoga and meditation teacher in New York City. Her classes are inspired by various schools of yoga. She is known for teaching alignment-based classes infused with thematic dharma and yoga philosophy. Neeti believes that the way you move and breathe on your mat shapes the way you move and breathe in your life. You can practice with her in person at Modo Yoga NYC. To learn more about Neeti, check out her Instagram @neeti.narula.
The post The Absolute Best Yoga Poses to Practice After Sitting All Day appeared first on Outside Online.
This content was originally published here.